


Rubrics
What is a rubric?
A rubric is a table that allows you to assess students’ work efficiently and reliably. It can also be used to give feedback.
In a rubric, you use the learning objectives or assignment description to formulate a description of the work for one or more criteria per level (e.g. unsatisfactory, satisfactory and good). Rubrics are ideally suited for assessing open-ended questions, writing assignments, oral presentations, projects or creative work.
Advantages
- Rubrics clarify expectations and requirements for fellow instructors and students.
- They substantiate and justify final grades consistently.
- They provide feedback: students see how they can improve their work.
- For teachers, they provide reliable and efficient assessment, especially with multiple assessors or large groups of students.
Disadvantages
- They give the illusion of precision. Rubrics are still open to interpretation.
- They are often too detailed (too many criteria or levels, multiple pages) and therefore not manageable for instructors or readable for students.
- Making a good rubric is time-consuming.
Different kinds of rubrics
A rubric can be organised in various ways, depending on the set-up of your course or assignment: with one criterion (holistic) or several (analytical), with or without scoring or weighting, with two levels (e.g. only pass/fail) or more. Three common types of rubrics are described below.
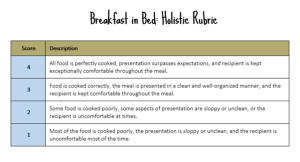
With holistic rubrics, you look at the work as a whole: so you are not looking at the work on several criteria, but on one holistic criterion. You can distinguish as many levels as you want. They are quick and easy to fill in. A disadvantage is that they offer less specific feedback; it is unclear which aspects weighed most heavily in the assessment. For more complex or heavily weighted assignments, a holistic rubric is therefore less suitable.
Below is an example of a holistic rubric. The scores in the left-hand column can also be replaced by levels (e.g. excellent, good, moderate and unsatisfactory).
end
With an analytic rubric, you assess the work on multiple criteria and multiple levels. The advantage is that the assessment highlights different aspects, which clarifies the final grade and gives the student more specific feedback.
There are also disadvantages: it is time-consuming to make such a rubric because you have to describe several levels for each criterion, which in practice often do not always fully match. Also, the differences between these levels are often subtle and open to interpretation, so the more criteria and levels you use, the less useful they become in practice. More is not always better for students either: they may be less inclined to carefully examine a rubric with many criteria and levels. On the other hand, when meeting to discuss their assignment, they may focus too much on details to try to increase their grade. Analytic rubrics may also get in the way when students compare their work among themselves in detail.
Below is an example of an analytic rubric. Here too, you can rearrange the levels (e.g. excellent, good, moderate and insufficient). Scoring is optional.

end
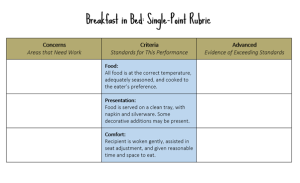
A single-point rubric is a more practical alternative to an analytic rubric: it distinguishes multiple criteria, but you only formulate a description for one level: that of the pass mark. The columns on the left and right remain empty: you only fill them in when grading to indicate where the student performs below or above the expected level.
The advantages of a single-point rubric are that they are quick and easy to make: after all, you only need to define the pass mark. They are more convenient to use for both students and instructors because there is less reading. Nevertheless, instructors can use them effectively to justify the final grade and they can serve as a common reference point in teaching teams. Students can also easily see how to improve their work. They are also more flexible than traditional rubrics: you don’t have to anticipate in advance in what ways students may perform below or above expectations. This gives students more leeway. A disadvantage is that the instructor has to fill in more when grading, which takes more time.
Below is an example of a single-point rubric. You can also name the left and right columns differently (e.g. unsatisfactory/excellent, or areas to grow/areas that glow).
end
How do you make a rubric?
1. Define the purpose of the assignment. Consider the following questions:
- Why are you giving students this assignment? What should they be able to demonstrate with it?
- What are the learning objectives it assesses?
2. Decide which type of rubric you are going to use: holistic, analytic or single-point (see above).
3. Determine the criteria.
- Review the assignment description and learning objectives and, if available, students’ completed assignments from previous years.
- Make sure you choose clear, measurable and essential criteria that do not overlap with other criteria.
- It is advisable to limit the number of criteria (3 to 5) for the sake of clarity and readability.
4. Define the levels.
- Most rubrics distinguish between 3 and 5 levels. More tends to be impractical.
- Do you want to use points, numbers or descriptors? You can also work with ranges, e.g. 0-5.4; 5.5-6.9; 7-8.4 and 8.5-10.
- It is most motivating to go from high to low, not the other way around.
5. Describe each level per criterion.
- Determine the pass mark: what does an assignment look like that scores a pass on all criteria? Then determine the upper and lower levels. What does a very good assignment look like? And what if the student does not meet any of the learning objectives? Then fill in the other levels.
- Tip: For the pass mark, also describe what the student has not yet done. For example: a selection has been made between major and minor issues, where some major issues are underexposed or minor issues receive too much attention.
- Indicate to what extent the requirements have been met and make sure the descriptions are specific, concrete and measurable. Avoid using ‘hollow terms’, e.g.: the structure is sufficient / the structure is good. What does the structure look like when it is sufficient?
- Use the same wording to describe the different levels to increase readability.
- Make sure the use of language is suitable for the students’ level.
6. Decide how to calculate the final grade.
- How do you get from an assessment to a grade?
- Is there a weighting between the criteria or do they all count equally?
- Are there ‘knock-out’ criteria, or criteria on which students must score a pass for a sufficient final grade (e.g. formal requirements met)?
- Are students allowed to compensate for any failing criteria, or are they only allowed to fail one or a few criteria, for example?
7. Test the rubric.
- Ask your colleagues for feedback on the rubric.
- Use the rubric with fellow instructors to assess the work of one or two students together (calibrate). Does everyone come to the same grade, or are there differences? Are the descriptions unambiguous, or open to interpretation? Does the final grade match your professional ‘feeling’, or does the rubric lead to a grade that is too high or low?
8. Evaluate the rubric after use in practice and adjust where necessary.
Tip: Ask an generative AI such as ChatGPT (or others) to create a rubric for your assignment. The right prompting is crucial here. Give the generative AI the assignment description and ask, for example, which criteria should be in the rubric. Then specify which criteria and levels you want to use and ask the generative AI to create a rubric in a table. Be careful not to enter any privacy-sensitive information.
Prompt example:
“I want a rubric for an essay on X. The rubric should contain four criteria: ‘Quality of Research,’ ‘Argumentation,’ ‘Organisation,’ and ‘Language and Style.’ Each criterion should be rated on a scale of 1 to 5, with detailed descriptions for each level. ‘Quality of Research’ and ‘Argumentation’ are more important and should each account for 40% of the total grade, while ‘Organisation’ and ‘Language and Style’ weigh 10% each. The rubric should be presented in tabular form and have a formal, academic tone.”
- Limit your rubric to one page at most.
- If your course is taught by several instructors, discuss the rubric and how it will be used for grading together beforehand to limit any differences between markers. It often turns out that the rubric is open to interpretation (what does ‘good use of sources’ mean, for example?). You can also hold a calibration session in which you grade a few assignments together using the rubric to ensure that it is completed in a consistent manner.
- Publish the rubric in advance; this way students understand the expectations and assessment criteria.
- Let students use the rubric for peer feedback or self-assessment. During class, give sample assignments from previous years and let students fill in the rubric together. This helps them understand the criteria and improve their own work.
- For advanced students (e.g. at master’s level), consider making a rubric for the course together. Define the criteria and level the work should meet together. This helps to increase motivation and commitment.
- You can also create rubrics in Canvas and use them when assessing an assignment.
Would you like advice on using rubrics in your course? Feel free to contact the assessment experts from the central team of the TLC network via tlc@uva.nl.